
Benefits, & design
Q) What are the 3 main benefits of a TiltPlate?

A) Number one is
safety. No
more climbing a 16 foot ladder to reach any part of your antenna or tower.
Number two is convenience. You can single handedly
lower your antenna from it's normal operating position to ground level for
maintenance in a matter of minutes. Whether you have a simple
aluminum yagi or a high tech antenna like the SteppIR, it is nice to work on
it from the ground. Number three is protection in a storm. If you know you will have high winds (e.g. a
hurricane warning), you can lay your tower and antenna down at ground level and
tie it off.
Q) What were the design considerations for the TiltPlates?
A) The design focuses on strength, quality, and durability while
still using light weight materials when appropriate. All of the hardware is
stainless steel to withstand years of
exposure to the elements. The bearings
(click) are rated for the harsh
environment. The TiltPlates use high quality U-bolts from DX
Engineering. The plates are 6061 aluminum and machined on a CNC for
dimensional accuracy. The TiltPlate is designed to protect
your antenna investment and provide convenience and safety for you.

Q) How
strong is the TiltPlate?
A) Joe / WD0M recently lost his
tower in a mircoburst. Click here to
see some pictures of the aftermath and Joe's comments.
Q) The TiltPlate is pretty expensive. Why is that?
A) The major costs are for raw material (aluminum plate),
machining, top quality components, and labor. When
you consider a tower and antenna can cost $10,000 or more, the safety
and convenience of a TiltPlate is put into perspective.
Q) Can I really lower my tower to the ground for maintenance in just a few
minutes?
A) If you have a crankup / tiltover tower, there is one winch for
each function. You can motorize both winches if desired. And
with the TiltPlate you can really be working on your antenna in a matter of
minutes. Here is a link to my MA-850, you can see more pictures on my "antennas
and towers" web page. Note, U.S. Towers is no longer selling
their raising fixtures with the MD-75 motor but you can still buy the MD-75 and
install it yourself.
Towers supported and how to select the right TiltPlate model
Q) What type of tilt over towers can I use?
A) The TiltPlate will work with any tiltover tower that pivots near
ground level or has a pivot point up to about 5 feet off of the ground. If
your tower pivot point is higher than 5 feet it may still work if it can tilt
beyond horizontal. See next FAQ.
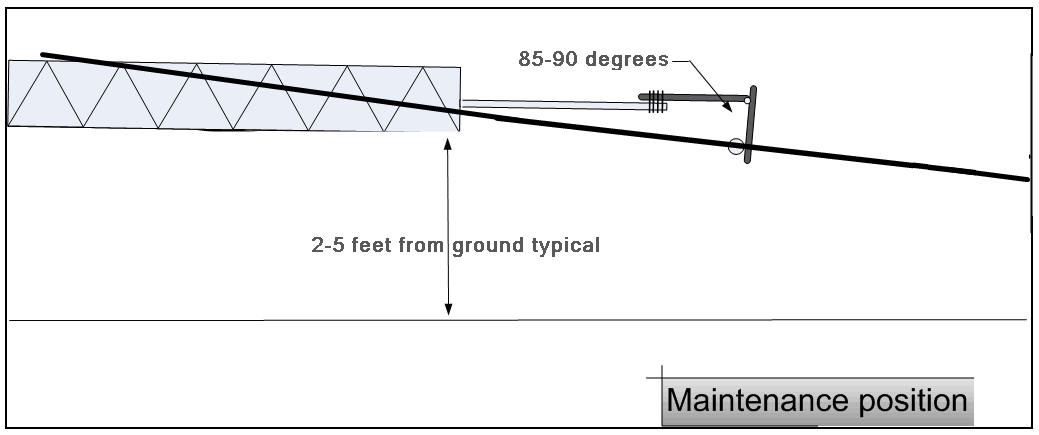
Q) How would it work if my
tower pivots at 20 feet?
A) The TiltPlate must open beyond the
normal maximum of 110 degrees for the STANDARD model and 90 degrees for the
MONSTER model. There is a "no cost" option to allow the
plates to open to about 140 - 160 degrees. Click
here for more information.
Q) What models and options are most popular?
A) Here is the approximate breakdown:
60% Order the "stackable"
configuration (recommended if you want to put another antenna above the TiltPlate)
40% Order the
Non-Stackable configuration
10% Order the "Mini"
size model (up to 70 lb and 10 sq ft antenna)
50% Order the "Standard"
size model (up to 125 lb and 25 sq ft antenna)
40% Order the "Monster"
size model (up to 250 lb and 35 sq ft antenna)
60% Order the KARLock
option
20% Send in pictures of their installation to share on the web page. We encourage everyone to send them along with tips and comments.
Your pictures could help
someone that has a similiar antenna or tower setup.
Q) Which model is right for me?
A) The main considerations are the weight and wind load of your
antenna. For smaller antennas, the space available between the
elements where the boom/mast plate mounts is a consideration. The
Mini-TiltPlate may be a better fit for the smaller antennas since it only
requires 12 inches for mounting. You may also want to consider
whether you plan to change antennas in the future since the boom u-bolts can be
changed to support different antennas.
Click to go to the specifications page
for more information.
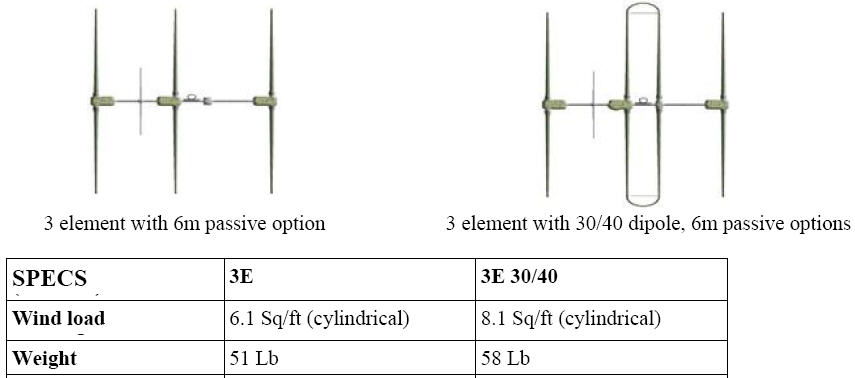
3 el steppIR example
The
3 el Steppir will work on either the Mini-TiltPlate or the
Standard model. See pix below. If you plan to upgrade
antennas at some point, the Standard model could be a better choice.
If not, the Mini-TiltPlate will work fine and is less expensive. The Mini
is also 5 lbs lighter than the Standard model and has 0.2 sq ft less wind load
whcih may be a consideration for smaller towers. Also note that the Mini
model does not support a boom truss which is not an issue for the 3 el unless
you are considering the cosmetic loop droop truss option.
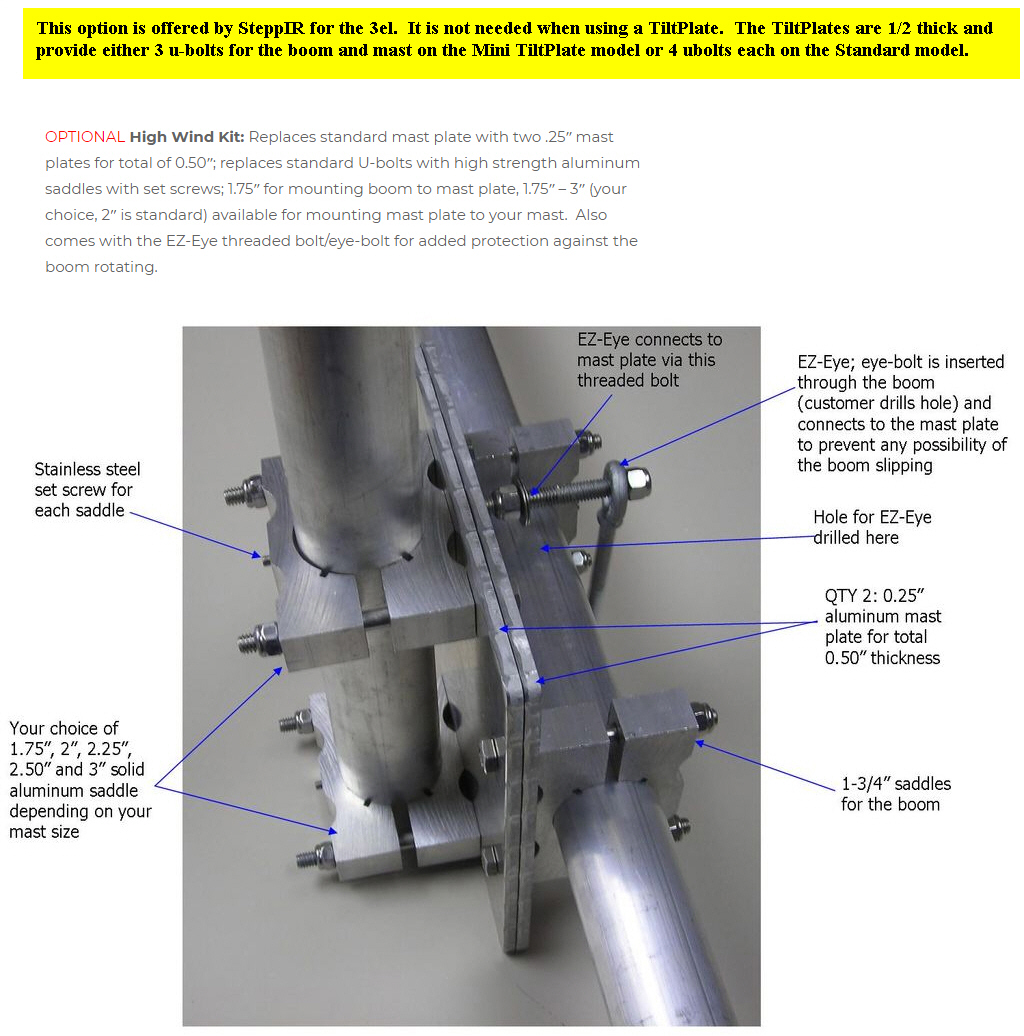
On a related note, SteppIR offers a "high wind kit" for the 3el SteppIR that is not needed with a TiltPlate.
Installation and
Maintenance
Q) How do I
install the TiltPlate?
A) Click here for the basic
installation
instructions. There are also additional notes in the "Operation
and Options" section below for some specific antennas.
Click here for instructions on Leveling the elements. (link is also in the FAQ below)
Click here for KARLock installations instructions
Q)
Leveling the elements -- How do I
compensate for the plate offset and insure the antenna will be level?
A) The boom is rotated to compensate for the
offset. Click here to read about several
methods you can use to get the right offset.
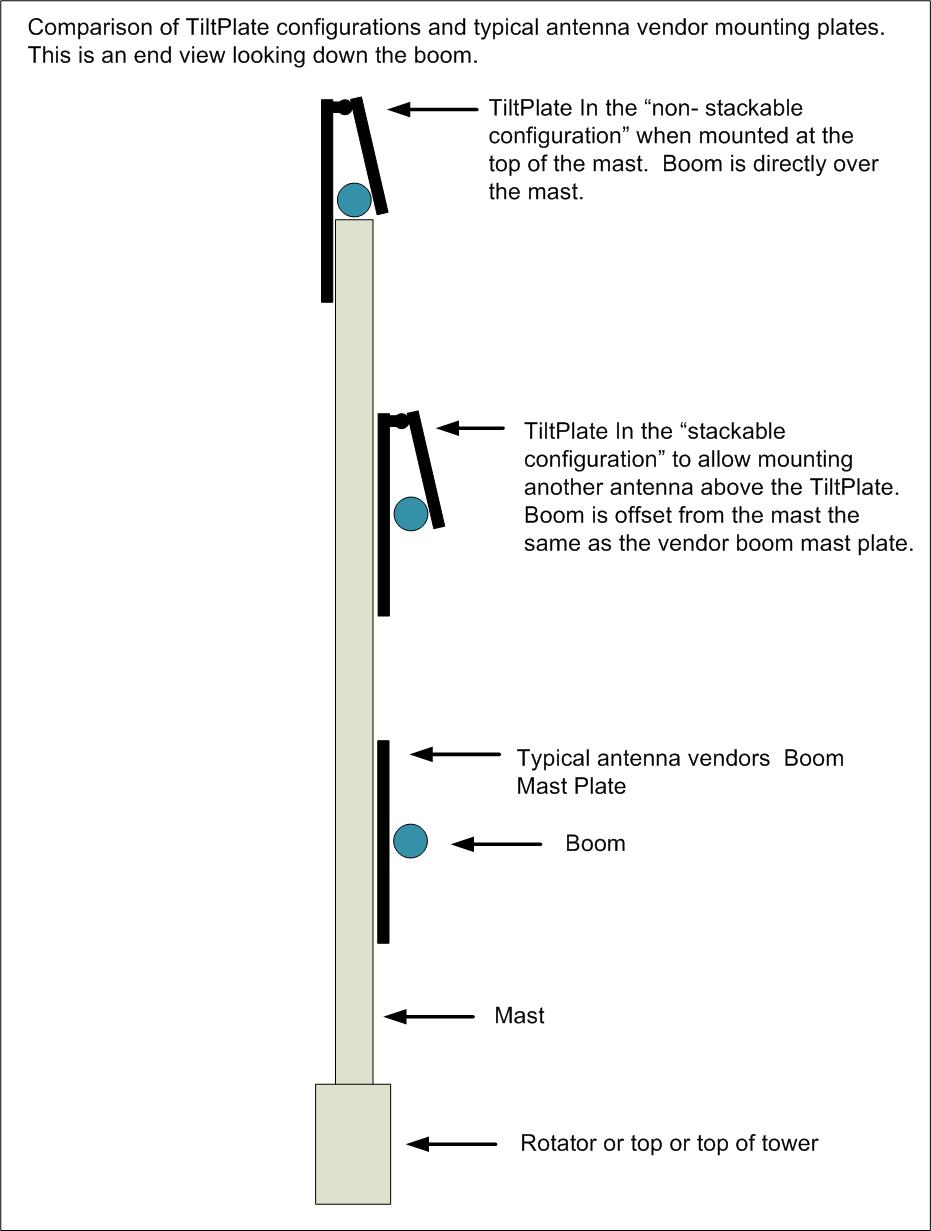
Q) How is boom located relative to the mast with a TiltPlate?
A) The boom relative to the mast is the same as the typical vendors
boom mast plate in the "stackable configuration." In the non-stackable
configuration it is actually centered over the mast.
Q) What are the dimensions of the TiltPlate?
A) The Standard and Monster models are both the same size, 18" W x 26"
H.
The Mini-TiltPlate is 12" W x 26"H.
Click to go to the specifications page
for pictures with dimensions
Q) The TiltPlate is wider than my original boom/mast plate and on my application
the boom mounting location is a little off center. The antenna is
not completely balanced end to end. Should I try to
compensate?
A) In most cases it is not a problem. If you
want to adjust the balance, here are some options to consider. You can make a sliding weight from a
piece of steel bar or other item from the junk box and a u-bolt.
You can insert a short section of water
pipe at the "light end" of the boom. You can also nest a smaller
section of water pipe to get extra weight if needed. It's an inexpensive
option and is not visible once installed.
It doesn't take much weight (3-5 lbs) when
it is 10-15 feet from the center to provide the necessary balance.
Q) Is any regular maintenance required.
A) The bearings have a
grease fitting but only require greasing every
5 years or so to keep the moisture out. Any type of automotive
grease is fine. Although the bearing block is nickel plated it will
develop surface rust. This won't affect the functionality but you can
paint the bearing races if desired or use a "rust inhibitor" like LPS 3.
Click here for more
information on LPS3. Painting or the the rust inhibitor is not required and purely cosmetic.
Click here for the bearing specs.
Click here to see an an
example of what the surface rust will look like.
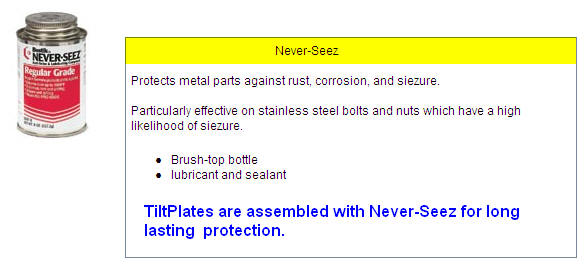
All of the stainless fitting are assembled with Never-Seez to allow easy disassembly should it ever be required. No other maintenance is required. DX Engineering carries this product for about $15.
Q) Can you provide installation service or do you recommend anyone?
A) I only sell the product but any professional installer should be
able to do this for you. For example Matt from XXtowers is familiar with
the TiltPlate and has installed them before.
His web page is
www.xxtowers.com
Operation and Options
Q) Will the antenna stay perfectly
level as the tower tilts?
A)
As the tower tilts over the antenna will not stay perfectly level. However
as it gets close to the ground you can easily swivel it as needed.
Some folks rest the antenna on a saw horse or use a bungee cord to hold it in
place for maintenance.
Q) It seems like there should be a latch or lock to keep the antenna from
moving. Is a lock needed?
A) No, the weight of the antenna exerts enough force needed to keep the
antenna in place. The tilting plate is intentionally held a few degrees (6-12
depending on boom size) off vertical by the boom u-bolts to generate the down
force.
Q) What happens when the wind really blows?
A) In high winds (30-40 mph) the antenna will tilt up and
return to the normal position as the wind subsides. It won't
lift
unless the wind is from the right direction (from behind). The wind
actually forces the plates together when it is from the
front side (diagram). This
tilting is normal and working as designed. During
Hurricane Ivan my 4el yagi tilted up about 30 degrees a few times in the 40+ MPH winds.
Gusts of 50+ MPH were recorded in other storms, again with no ill effects.
In very high winds the antenna can go almost vertical.
Click here for a video sent in by John / KO4XJ showing his 4 el SteppIR without a KARLock tilting in a storm.
Click here for a video showing a DB18 in a storm without the KARLock. Provided by Kim / K4ATX. Kim estimated the gusts at about 30 MPH.
The videos are also
available on the NN4ZZ YouTube
channel.
Q) I live in a very windy area and would feel better if I could lock the
TiltPlate to avoid the lifting. Is there any provision for that?
A) The KARLock is an optional lock
you can add to your TiltPlate to prevent lifting in heavy wind. The lock
only engages in high wind conditions and only when the tower is in the operational position. You
don't have to climb the tower or remove screws, etc to tilt your
tower. CLICK here or on the picture below for more information.
Q) I'm not sure if I want a KARLock, can I wait and install it later?
A) Yes, it can be installed later. However, it
is easier to install and adjust from the start when the boom is first attached
to the TiltPlate. When retrofitting a KARLock , there are 2
installation options.
1) Tilt the tower, remove the antenna (or just the element tubes for a SteppIR) and install the KARLock per the instructions.
2) Install the KARLock with the tower in the vertical postion. The antenna does not need to be removed with this method but it does require climbing a ladder.
If you order the KARLock and TiltPlate at the same time, the location of the "catch plate" will be marked for the proper adjustment based on your boom diameter.
Q) Is there any problem with the TiltPlate/antenna slipping on the mast.
A) The Standard and Monster model
TiltPlates use 4 U-bolts from DX Engineering to secure the plate to the mast,
they should not slip in even the heaviest wind. If you ever have a problem you
can pin the mast to the aluminum plate but again this is not needed or
recommended. The Mini-TiltPlate uses 3 u-bolts but for the smaller antennas
this is more than adequate. The Mini-TiltPlate is drilled for a 4th mast
u-bolt should you want to add one.
Q) Is there any problem with the antenna boom slipping where it mounts
to the TiltPlate?.
A) The Standard and Monster model TiltPlates use 4 U-bolts (or V bolts for the MonstIR) from DX Engineering to secure the boom to the
movable plate. The
Mini-TiltPlate uses 3 u-bolts for the boom but for the smaller antennas this is
more than adequate.
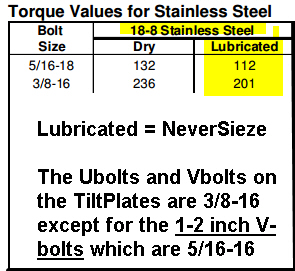
Q) Is there a torque specification for the
U-bolts?
A) Most people just tighten them snuggly but here is a table listing the recommended torque.
CLICK for more information on the DX Engineering support page.

Also here is some additional mechanical data. Note, we ship all hardware with Never-Seez applied.
Antenna Applications,
Boom sizes, and Adapters
Q) What types of antennas can be used with a TiltPlate?
A) The TiltPlate works with any yagi or log periodic type antenna as
long as there is room between the elements to attach the boom to the TiltPlate boom plate. The boom
plate is 18 inches
wide on the Standard and Monster models and 12" wide on the Mini-TiltPlate.
The TiltPlate supports round boom sizes from 1 inch to 3 inches.
Four (4) u-bolts are used on the Standard and Monster models. The
Mini-TiltPlate for smaller antennas uses 3 u-bolts.
In addition to supporting the range of round booms, a number of adapters and modifications are available for other
antennas using square booms or having special mounting needs for phasing lines,
etc. Here are some of the antennas supported:
SteppIR Antennas
NOTE: Click for SteppIR installation tips
- SteppIR 2el
-
the Standard model TiltPlate is mounted between the tubes instead of in the
factory boom plate position. See the customer pictures for the W2CEA
installation on the customer pics page. This antenna is also a good fit
on the Mini-TiltPlate.
- SteppIR 3el Click to see
faq on the Mini and Standard model above
- SteppIR 4el If you have the optional 30/40
loop, click for an important
note.
- SteppIR MonstIR
(Click for an important
note for MonstIR)
- SteppIR DreamBeam18
-
Click for pix
to see how the TiltPlate fits between the tubes on the Standard model TiltPlate
Click here to see FAQ below about boom truss mast cable clearance tips for the DB18
Paul / W0PL provided some installation tips that might be helpful to
others who are assembling a DB18E on a TiltPlate.

CLICK for more information and
pictures
Also CLICK here or on image below to see a video by Al / K0CN
CLICK here for more excellent pictures and video by Max NG7M.
- SteppIR Dreambeam36 - Click for an important
note for DB36
- SteppIR
Dreambeam42 - Click for an important
note for DB42
EZeye bolt -- some SteppIR models have an EZeye bolt.
The
EZeye (click for picture)
is NOT needed with the TiltPlate. The EZeye is a SteppIR product intended to provide additional resistance against
slippage of the boom. The TiltPlate uses 4 V-bolts instead of the 2
u-bolts that are supplied with the SteppIR Mast plate. So the
EZeye is not required or recommended. There have been no reports of
slippage on the TiltPlate without the EZeye.
Optibeam Antennas
-
Click for adapter information -
Optibeam (40MM square boom)
OB9-5,
OB11-5
-
Click for adapter information -
Optibeam (80MM boom)
OB16-3 OB
15-7 OB 13-6 OB12-6 OB-4030 OB2-40
-
Click for adapter information -
Optibeam OB18-6
(special 80MM
boom mounting plate required)
M2 Antennas
- M2 KT36XQA (3 inch boom)
- M2 10-30LP8 (3 inch boom)
- M2 40M4LLDD -- Click for special instructions and parts needed.
Hygain Antennas
- Click for adapter information - HyGain TH7 & TH11DX (phasing tubes, special adapter required)
Tennadyne Antennas
-
Original model
Click for adapter information -
Tennadyne T8, T10 & T11
-
New HD model Click for adapter
information -
Tennadyne T10 HD, T12 HD & T14 HD
Mosley Pro 67 Antenna
- Click here for a link with tips and pictures for installing the Mosley PRO 67. They include tips on leveling and the phasing tube routing.
Ultrabeam Antennas
- UB640-VL2.3 -- click for adapter for the 60MM square boom
Telrex TB6EM
Click here for a link to the maodifications needed for this antenna. Monster Model and 3.5 inch u-bolts.
Q) What U-bolts are used for
the round booms?
A) U-bolts and V-bolts from DX Engineering are used, here are the part numbers:
1 to 2 inch boom (e.g.
2 el & 3 el SteppIR) using V-bolts,
DXE-CAVS-2P
2 inch boom ( e.g. DreamBeam 18 & 18E) using U-bolts,
DXE-SAD-200B
2 1/2 inch boom ( e.g. 4el SteppIR, DreamBeam 36) using U-bolts,
DXE-SAD-250B
2 to 2 3/4 inch boom (e.g. MonstIR) using V-bolts, DXE-CAVS-3P
3 inch boom ( M2 KT36XQA and other yagis ) using U-bolts, DXE-SAD-300B
See the DX engineering web page for details on the DXE clamps.
www.dxengineering.com
Q) Can I order a standard model with the 2 -
3 inch boom
V-bolt clamps or the 3 inch U-Bolts? I have an antenna that is light enough for the
standard model but has a boom larger than 2 1/2 inches.
A) All clamping options are available on all models. The fixed sized U-bolts are the preferred choice but either
U-bolts or the V-bolts will work. The 3 inch
U-bolts support up to a 3 nch boom but the the 2 - 3 inch
V-bolts only support booms up to 2 3/4 inches due to the
thickness of the plates. These V-bolts are listed on the DX Engineering site as
supporting up to a 3 inch
boom but that is not the case with the TiltPlate.
Q) Will the TiltPlate work with a "hexbeam" type antenna?
A) No, the TiltPlate won't but we have a device called the HexLock that will support this type of antenna.
Click here or on the HexLock logo below for more
information.
Q) Will the TiltPlate work with a Quad antenna?
A) No, the TiltPlate won't but we have a device available
that will. The QuadLock will swivel the loops and allow you to tilt the
tower to the ground for maintenance. Click
here or on the QuadLock logo for more information.
Boom Truss Mast
Q) What about the boom truss mast? (size, material, length)
A) The boom truss mast is optional, check your antenna manual to see if one is
needed. The purpose of the boom truss mast is to provide an attachment
point for the boom truss cables if your antenna requires one. The boom truss clamps
provided are 2 inch U-bolts from DX Engineering. The actual mast section
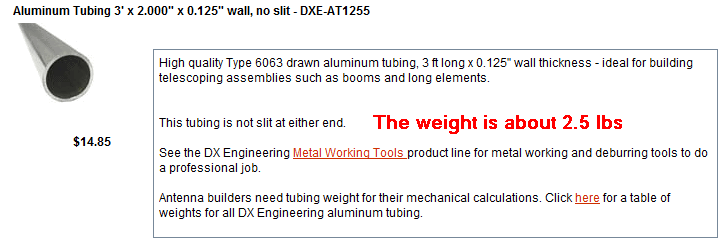
is typically provided by the antenna vendor. The length is
usually about 3 feet Check your antenna manual to see where they
recommend attaching the cables. For example, on the SteppIR 4el yagi
the attachment point is between 26 and 30 inches above the boom so a 36 inch
mast is more than adequate. DX Engineering is a good source for
tubing.
Also see the BENT BOOM MAST option below that I provide as an option.

Q) Since the moveable plate is held out a few degrees, the boom truss mast
is not perfectly vertical, is that a problem?
A) The boom truss cable attachment point may be a few inches off center ( i.e not
directly above the boom). The offset is required on the "stackable"
TiltPlates to provide the proper clearance for the boom truss cables so they
don't interfere with the mast that extends above the TiltPlate. The
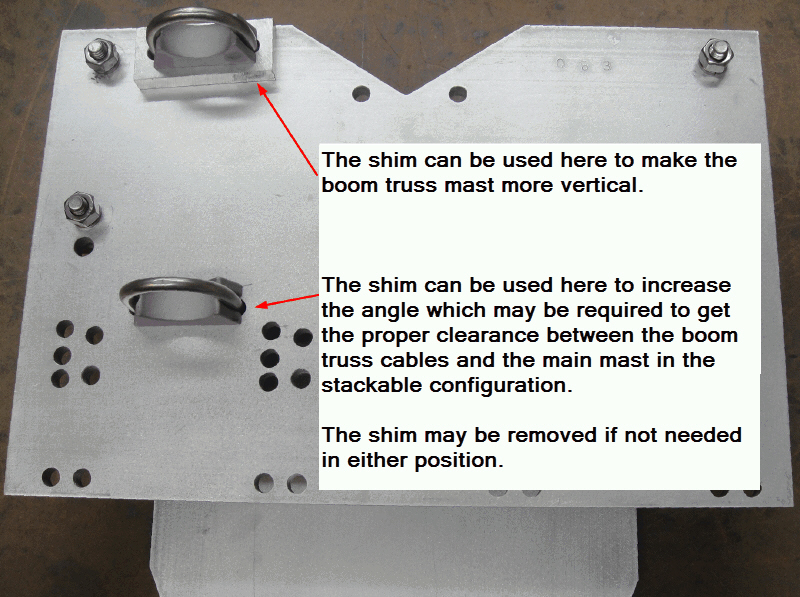
shim block can be used under the bottom u-bolt to get more clearance in this
case.
The shim block can also be used under the top u-bolt if you would like to reduce the amount of offset and make the truss mast more vertical. This would be useful for the larger diameter booms and also when using the TiltPlate in the non-stackable configuration..
The 1/2 inch thick shim block
is included with the TiltPlates. If you need one of the shim blocks, it's available for $3 (block is free, just
pay for S&H). Click
here for a picture of
the block.
The "Bent Boom Truss MAST" Option
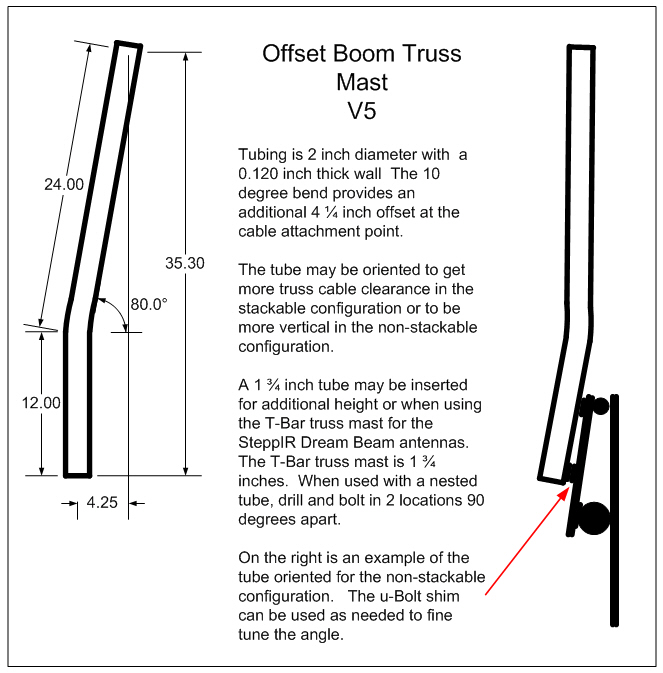
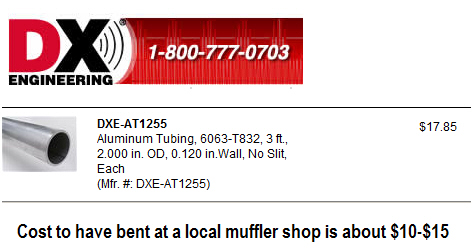
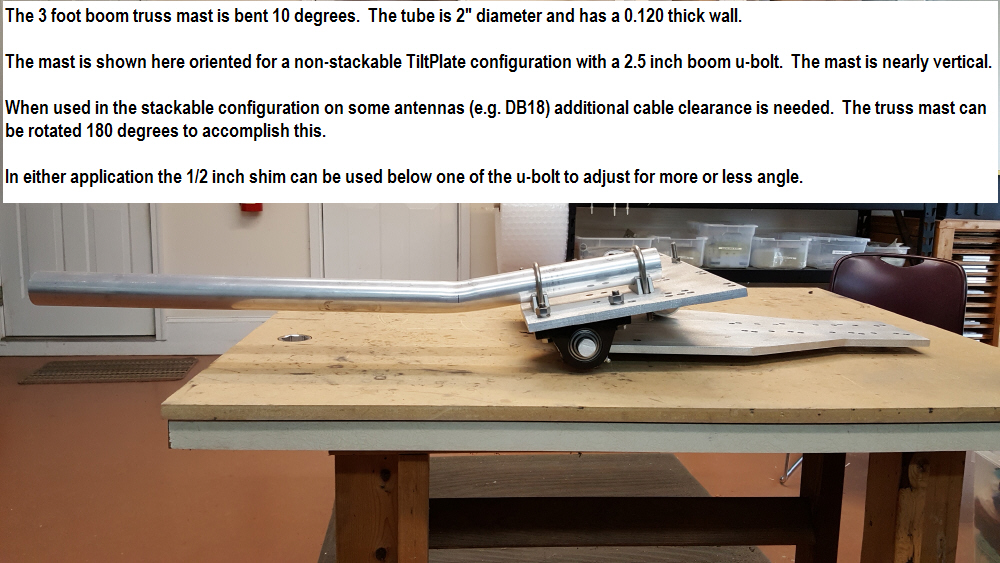
You can get additional adjustment if needed by using an angled boom truss mast. You can make your own or I sell one already bent. Prices on the main page.
Q) The boom truss cables on the SteppIR DB18 need
additional clearance when using the STACKABLE TiltPlate configuration.
What are the options?
A) The boom truss mast on the DB18 is shorter than some of
the other SteppIR antennas so the truss cables will interfere with the main mast
unless you use the options below. There are other antennas where the
boom truss may also need some additional clearance.
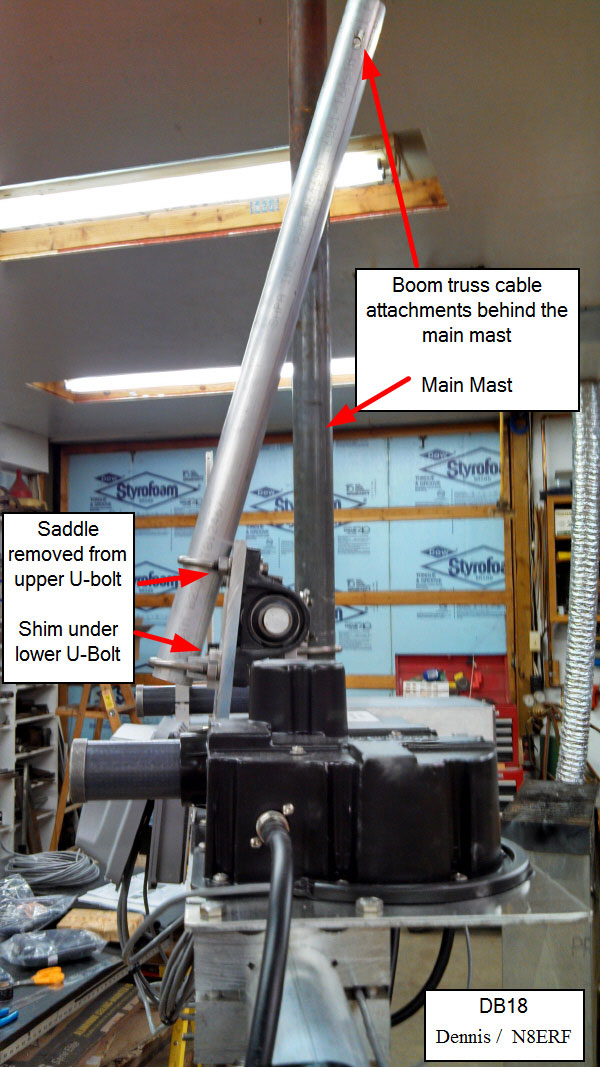
Stackable Boom Truss - Here are some ways to get more truss cable clearance if needed. You can use one or several of these methods in combination.
use the shim on the lower u-bolt
move the lower u-bolt up to a set of holes closer to the top. The newer plates have several sets of holes for mounting the lower u-bolt.
remove the saddle under the upper u-bolt (the saddle on the lower u-bolt provides more than enough resistance to twisting)
use a longer boom truss mast - for example use a 4 foot mast instead of a 30 inch or 36 inch mast
use a mast that has a slight bend (see PREVIOUS FAQ).
Warning -- if you pull the boom backward too far behind the main mast it can cause the antenna to lift and engage the KARLock when tilting over the tower. One way to avoid the problem is to use a lateral strut although this is not normally needed except on the larger SteppIR antennas. Click here for more information on the lateral strut options.
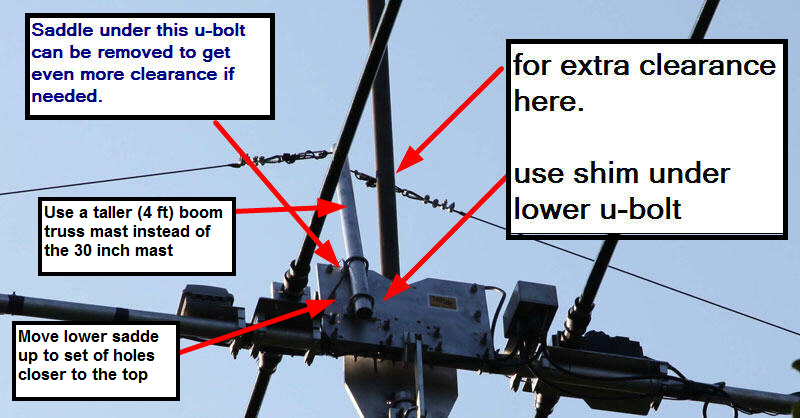
Click for DB18 pictures - Lou / W0FK
Here is a picture showing the options Dennis / N8ERF used on his DB18
Q) I have the "stackable" TiltPlate model. Can I just attach the
truss cables to the mast that extends beyond the top of the TiltPlate?
A) It will work but is not the recommended setup. The boom
truss mast is attached to the moveable boom plate to keep the cable tension on
the boom constant as the tower is tilted over. Connecting the cable to the
main mast will work but the tension will change as the tower is tilted allowing
the boom to droop more. It will be harder to set the cables up for
the proper boom support.
Q) I don't need a boom truss on my antenna but I have one of the SteppIR
antennas with the trombone element in the center. There is an
optional truss bracket supplied by SteppIR to give the trombone some extra
support. Can I use the TiltPlate boom truss mast for this?
A) Yes, you can attach the trombone truss cable to the boom truss mast.
You may also be able to use the aluminum bracket supplied by SteppIR if there is
room to mount it next to the TiltPlate. And another option is to attach
the SteppIR bracket directly to the TiltPlate using some of the extra holes next
to one of the boom u-bolts.
Mounting Other Antennas above, below and alongside your TiltPlate
Q) Can I put a second antenna
above the TiltPlate
on the boom truss mast?
A) The "boom truss" mast attaches to the movable
plate and can be up to 4 feet long. You can mount a small antenna (e.g. 2M yagi,
ground plane) to the mast. An aluminum mast is recommended to keep
the weight down. The total weight of the antenna and mast should not
exceed 10 lbs.
Both the weight and antenna height are factors since they counteract the effect
of the main antenna.
A light weight ground plane such as the Diamond X50A
(click for pix) is recommended. It weights about 2.5 pounds and is 5.6
feet tall. The height from the boom to the tip of the ground plane antenna
should not be more than 9 feet. See the customer picture submitted by KB5XE for
an example. The STACKABLE configuration is
the best option if you want to add an antenna above the TiltPlate.
Q) Can I mount an antenna
along side the
TiltPlate? I have a larger vertical for 2M that is about 17 feet tall?
A) You may be able to mount a taller vertical (for example the
Ringo Ranger AR 10) along side your
TiltPlate using a sidearm. Here is a diagram to
illustrate. You can also use this method to mount a
small 2M yagi above the TiltPlate. See the FAQ below on
STACKABLE TiltPlates configuration, this is the best option if you want to add a
second antenna
above the TiltPlate.
Q) Can I mount another antenna
below the TiltPlate?
A) You can mount a 30M or 40M rotatable
dipole on the mast below the TiltPlate and yagi. The booms should be parallel
so as not to interfere in the tilting action of the TiltPlate. Some have
reported that when the dipole is below
their yagi
the swr of the dipole is affected. They report good results when
mounting the dipole above the yagi. The
stackable option below will allow you to mount the dipole above or below.
Q) Can I stack two TiltPlates on one mast or
allow the mast to extend above the TiltPlate for a second antenna.
A) The standard non-stackable configuration is designed to
mount the TiltPlate as the last (or top) attachment on the mast. The STACKABLE
configuration allows the
mast to extend above the TiltPlate so you can mount a second TiltPlate,
rotatable dipole, or large vertical above it. Here is a link to the
STACKABLE TiltPlate configuration for more information.
This is the best option if you want to add a second antenna
above the TiltPlate.
Q) When should I order the NON-Stackable configuration?
A) The non-stackable configuration is
preferred
when the TiltPlate will be at the top of the mast. This
configuration centers the weight over the mast better. The
stackable configuration is slightly off center but when a second antenna
is mounted on the mast above the TiltPlate, it can be mounted to the opposite
side and compensate to some degree. However, the stackable
configuration can be used with or without anything above it as the difference is
minimal.
Q) Can I change the configuration later?
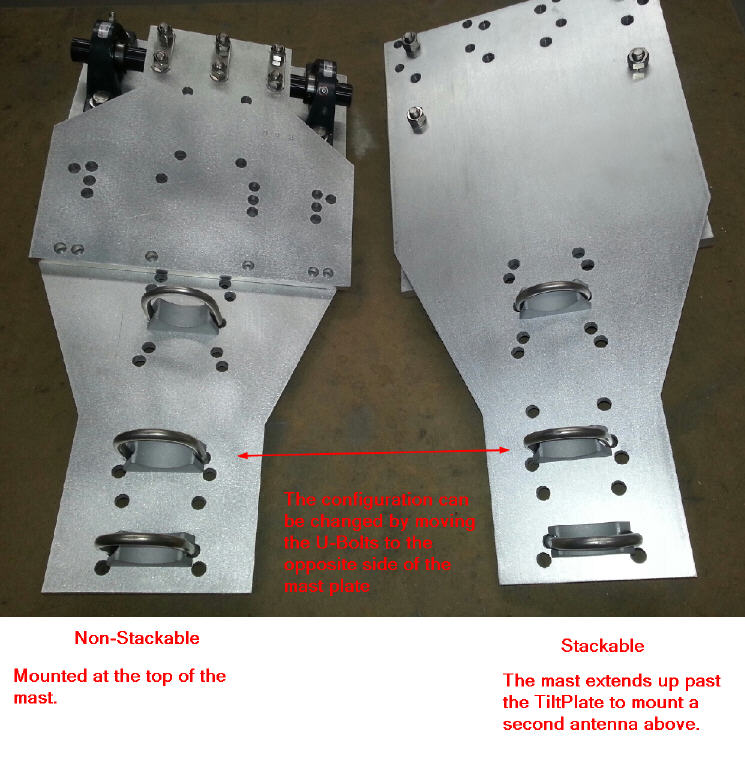
A) Changing between
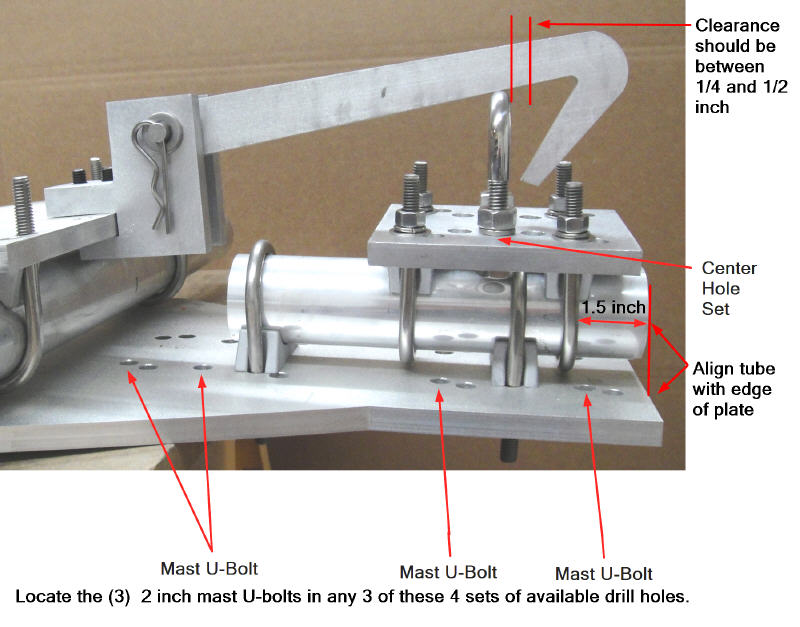
the two options is easy to do later. The pictures below show
the mini-Tiltplate but the process is the same for the other models. If
you use the optional KARLock and switch from non-Stackable to stackable you will
also need to add 2 additional U-bolts and the mounting tube. The second
picture shows the KARLock in stackable configuration with the mounting tube.
Q) Can you recommend a source for a good mast to mount a second antenna
or stack multiple TiltPlates?
A)
Stacking TiltPlates or mounting another antenna above a TiltPlate will put a
significant additional load on your tower, mast, and thrust bearings. Array
Solutions is an excellent source for heavy duty masts. If you are considering
an extended mast, this is worth a read: http://arraysolutions.com/Products/masts.htm
Ordering and Shipping
Q) What do I need to
consider before placing my order?
A) Here is a checklist:
Model - Standard, Monster or Mini. See the specs for details
Configuration - Stackable or non-Stackable (no extra charge, and you can change the configuration later in the field if desired)
KARLock - the KARLock is an option but it you are ordering at the same time as the TiltPlate, email me to save on shipping and get an single invoice
Mast diameter - most likely 2 inch but a 2.5 inch mast is also supported
Boom diameter - this depends on your antenna, see antenna specs or if your antenna is not listed above, check your manual. I may be able to help if you have questions on a specific antenna. Do you need any of the other options like the "bent boom mast" or lateral strut mount.
To ORDER or to get a QUOTE -- Click here
Q) What is the lead time to get a TiltPlate built?
A) I keep the components for all models in stock and will usually
assemble and ship your TiltPlate within one week of
receiving your order. Delivery is between 3-5 days.
Q) How does the payment process work? Is my credit card
information safe?
A) The on line payment process is handled thru PayPal. You
can use your credit card or PayPal account (if you have one). But you
don't need to have a paypal account to use the "buy now" button. Your
credit card information is NOT provided to me from PayPal. If you
would prefer you can send me a check. Please eMail me for details.
The on-line process is faster but either way is fine.
Q) If I order a TiltPlate and KARLock at the same time, how are they
shipped?
A)
They will be shipped in one box.
Q) If I'm ordering several items or have special shipping costs, how
does that work?
A) The web ordering
currently requires a separate transaction for each item. If you are
ordering several items, the "lateral boom strut", or have international shipping you can
pay me directly via PayPal in a single transaction. Contact me to
determine the total cost of your order. I'll send you a PayPal
invoice that you can pay with a CREDIT CARD or with your PayPal account.
You do NOT need a PayPal account to use this feature but if you have one you can
use it.
Q) I don't have a PayPal account (and don't want one), can I still pay the invoice with my credit card?
A - The PayPal screen can be confusing, click here for a "step by step" to pay using your credit card and WITHOUT a PayPal account.
Q) How will my TiltPlate be shipped?
A) The TiltPlates are securely bubble wrapped, boxed and shipped via UPS
domestically.
You will receive an email with your tracking number and can expect delivery in
3-5 days in the lower 48 states. The domestic packaging and shipping
costs are listed on the main page. We also ship to Alaska, Hawaii, and
Canada, but the rates are slightly higher. Please email me for
the rates to your location. See below for international shipping.
Q) What about International shipping?
A) International shipping rates vary considerably. The rate
to Europe can vary between $175 to $350. The rates to the
middle east or Australia for example can be up to $500.
Generally USPS Priority mail is less expensive to Europe and other countries.
Please email me for the rates to your location. A proforma invoice will be
provided to help with customs pickup. Please be sure to include your PHONE
NUMBER when ordering as this is needed for the CP-72 USPS customs form.
Q) What if I live in the Atlanta area or want to pick it up instead of
having it shipped?
A) No problem, I'll refund the shipping and
packaging cost when you pick it up.
Patent Information
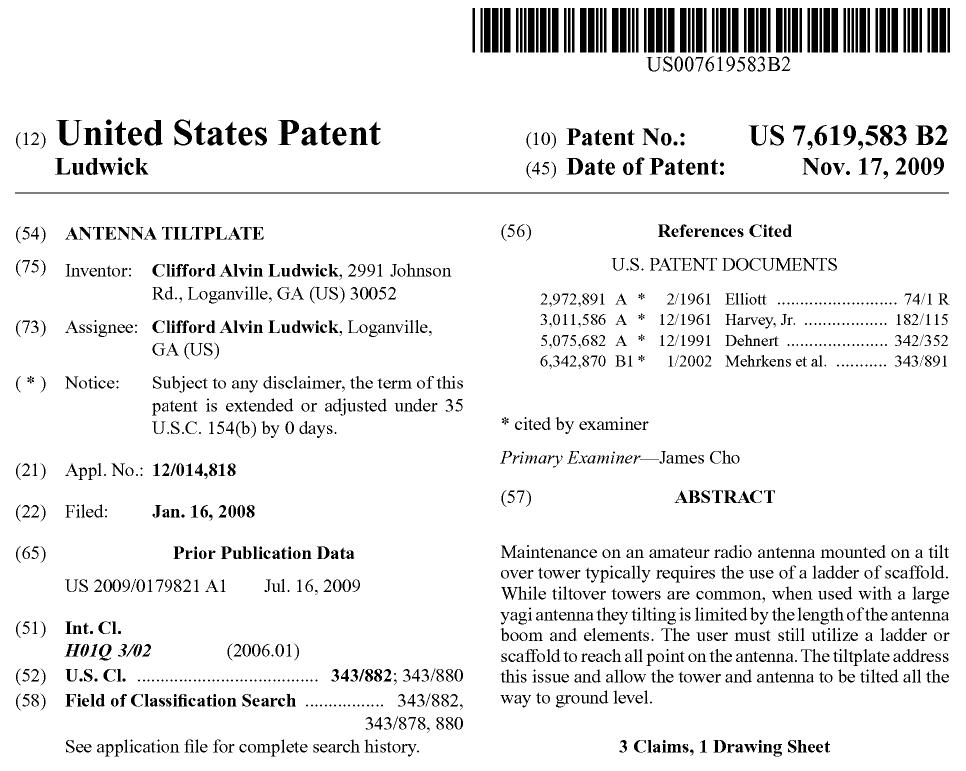
Q) What does the TiltPlate patent cover?
A) The patent covers the TiltPlate and
KARLock.
Click on the picture below for the full patent detail.
Build your own TiltPlate
Q) What if I want to build my own TiltPlate?
A) All of the information on the how to build one of the early models is posted. It will cost about $600 for parts.
Click Here for
more information. If you have any questions I'm happy to answer them.
Most folks find that my "for sale" models are really a bargain when you consider
the labor, quality, upgraded components, and improved design.